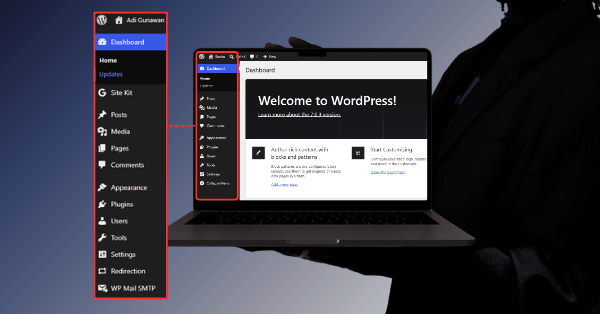
How to Navigate the WordPress Dashboard
Once you’ve chosen between WordPress.org and WordPress.com and gotten WordPress installed, the first thing you’ll see is the dashboard — also called wp-admin. It’s the control center for your entire site: every post, page, plugin, and setting is managed from here.
For a lot of beginners, the dashboard’s first impression is “there’s a lot going on.” This guide walks through exactly what each section does, so you can move around it with confidence instead of guessing.
Here is how it works and how you can apply it.
What Is the WordPress Dashboard (wp-admin)?
The dashboard is the administration area of your WordPress site, typically accessed at a URL like yoursite.com/wp-admin. It’s where you log in to manage content and settings — visitors browsing your site never see it.
Access to the dashboard is controlled by user roles. If you’re the site owner, you’ll usually have the Administrator role, which gives you access to everything described below. Other roles — Editor, Author, Contributor, and Subscriber — have progressively fewer capabilities, which matters if you’re managing a site with multiple people.
The Main Dashboard Screen
When you first log in, you’ll land on the main Dashboard screen. This is essentially a summary view, showing:
- A quick snapshot of your site’s activity (posts, comments, site health).
- WordPress news and updates.
- Quick-draft tools for jotting down a post idea.
You won’t spend much time here day-to-day, but it’s a useful starting point to confirm everything is running smoothly, especially right after installation.
The Left-Hand Menu: Your Main Navigation
Nearly everything you do in WordPress starts from the vertical menu on the left side of the screen. Here’s what each core section does.
Posts
This is where you manage your blog content. Posts are time-based entries that typically appear in feeds and archives, organized using categories and tags.
Example: A “10 Best WordPress Plugins” article would live under Posts, since it’s time-stamped content meant to appear in your blog feed.
Media
The Media Library stores every image, video, and file you upload to your site. Instead of uploading the same photo separately for each post, you upload it once here and reuse it wherever needed.
Pages
Pages are static, standalone content — think About, Contact, or a services page. Unlike posts, pages generally don’t appear in a chronological feed and are often organized hierarchically rather than by category.
Comments
If you allow visitor comments on your posts, this is where you review, approve, reply to, or delete them.
Appearance
This section controls your site’s design:
- Themes — install, activate, or switch your site’s theme.
- Customizer or Site Editor — adjust design settings, depending on whether your theme is a classic theme or a block theme.
- Menus — build and organize your site’s navigation.
- Widgets — manage small content blocks, often used in sidebars or footers.
Plugins
This is where you install, activate, deactivate, and update plugins — the add-ons that extend what your site can do, from contact forms to SEO tools to full e-commerce functionality.
Users
Manage everyone who has an account on your site, including their assigned role (Administrator, Editor, Author, Contributor, or Subscriber).
Tools
A collection of utilities, including import/export tools for moving content in or out of your site.
Settings
The general configuration area for your site: site title, tagline, timezone, permalink structure (your URL format), and other core settings.
A Quick Mental Map
If the menu still feels like a lot, here’s a simplified way to think about it:
| Section | What It Controls |
|---|---|
| Posts & Pages | Your actual content |
| Media | Your images and files |
| Appearance | How your site looks |
| Plugins | What your site can do |
| Users | Who can access and edit your site |
| Settings | Core site configuration |
Once that map clicks, the dashboard stops feeling overwhelming and starts feeling like a set of clearly labeled rooms.
A Typical First Session in the Dashboard
Here’s a realistic walkthrough of what a new site owner might do in their first login:
- Go to Settings → General and set your site title and tagline.
- Go to Settings → Permalinks and choose a clean URL structure.
- Go to Appearance → Themes and activate a theme.
- Go to Plugins → Add New and install a small set of essentials (SEO, security, backup).
- Go to Pages → Add New and create a basic About or Home page.
- Go to Posts → Add New and publish your first post.
Common Mistakes Beginners Make
- Confusing Posts and Pages, which affects how content is organized and displayed. As a rule of thumb: if it’s dated content meant for a feed, it’s a Post; if it’s static, standalone content, it’s a Page.
- Installing plugins without checking Plugins → Installed Plugins afterward, leaving unused or duplicate plugins active and slowing down the site.
- Skipping the Permalinks setting, which leaves your site with messy, non-SEO-friendly URLs by default.
- Giving every team member the Administrator role, when a more limited role (Editor or Author) is usually safer and sufficient.
- Never checking Settings → General, leaving a generic, unedited site title and tagline live on the public site.
Best Practices
- Set your Permalinks structure early — changing it later can break existing links if not handled carefully.
- Assign user roles based on actual responsibilities, not convenience. Not everyone needs Administrator access.
- Regularly review Plugins → Installed Plugins and remove anything you’re not actively using.
- Use the Media Library consistently instead of uploading duplicate images across multiple posts.
- Bookmark the dashboard login URL, and consider a security plugin that helps protect the login page itself.
Conclusion
The WordPress dashboard looks intimidating for about five minutes — then it clicks. Once you understand that Posts and Pages hold your content, Appearance controls your design, Plugins control your functionality, and Settings holds your core configuration, you have everything you need to manage a site confidently.
From here, the natural next step is getting comfortable with the tool you’ll use most inside that dashboard: the Block Editor.
Leave a Reply
You must be logged in to post a comment.